Highly Commended in the Landscape Photographer of the Year 2023


As landscape photographers, we often find ourselves chasing the perfect shot – waking up before dawn, trekking through rugged terrain, and patiently waiting for the right light to illuminate our scenes. It’s a labor of love, driven by our passion for capturing the beauty of the world around us. Little did I know that one such adventure would lead me to a surprising honor: a highly commended image in the 2023 Landscape Photographer of the Year competition.

The journey began like many others, with a desire to explore and capture the breathtaking landscapes.
I was in the North West Highlands of Scotland in the area North of Ullapool. The weather was very dramatic and changeable that day, sunny one minute, windy and heavy rain the next.

I knew from experience that this was the perfect weather to capture rainbows, if only I could find a scene where the light was going to be in the right direction.
I’d already been to a few locations that day, Sango Bay, Kyle of Durness, to name but a few, but it was one my way back South towards Lochinver that I decided to take a road I had not been down before.
As I drove along the road I spotted a beautiful expanse of reeds on the shore of a small lochan with a fantastic view of Arkle on the other side. As luck would have it the sun would be in just the right place for a rainbow in front of Arkle so I decided to stop.

I scouted around for a patch of reeds that I thought gave a pleasing shape with Arkle sitting nicely in the middle of the frame and waited, and waited.
Of coarse, as anyone who does landscape photography knows, whenever you setup the clouds roll in, light goes and the rain starts. I waited through several rain showers just hoping for that small gap in the clouds to let the sun through and maybe, just maybe, produce a rainbow.

My main issue was with the direction that the rain showers were coming from, they coming straight at me, which meant I had to let the rain pass over me before any possibility that a rainbow would appear. This meant trying to keep the rain off the front of the lens/filter using a rain cover, before whipping it off at the last second and wiping any excess rain drops off.

After what seemed like an age, and several good soakings, I finally got a brief window of intense sunlight and fired off a few frames. I did get one shot with a full rainbow but I prefer the image with the small rainbow arch with the beam of light shining through it. This was the image I entered into the Landscape Photographer of the Year competition and was lucky enough to receive a highly commended for.

Click here to view this image on my website

To be recognized among the talented photographers who participated in the competition was indeed an honor. It reaffirmed my belief in the power of photography to inspire, to evoke emotion, and to connect us to the world around us.

Posted in Uncategorized | Tagged , , , , , , , , | Leave a comment

I’m Back

It’s been a while since my last post, well six years to be exact, phew where did that time go? I have no idea, but needless to say I decided to start blogging again.

Quite a lot has happened since 2018, a global pandemic, a world wide recession, we left the EU, but I won’t be delving into any of those, I’ll just stick to photography I think.
I don’t really know why I stopped posting in the first place, maybe I thought social media and YouTube was the way it was going and blogging would fade away into obscurity, I don’t know. Well I didn’t start a YouTube channel and my social media presence is none existent, but if anyone is interested in the drivel that’s inside my head then this is where you’ll find it.

Posted in Uncategorized | Leave a comment

Why I swapped the Fuji X-T1 for the Olympus OM-D EM-5 II (Updated)

(Update – February 2018)

Firstly let me say that this is not a technical review full of test charts and low-light comparisons, just my own feelings and observations while shooting landscapes with these two cameras.

The Fuji X series cameras are really great and I like them a lot as cameras, but the post processing challengers have really worn me down over the three years I’ve shot with them.
I’m a Lightroom user and I always found the fine detail to be a bit smudged for my liking (the now famous water colour effect).
I’ve tried all manner of well known (and not so well known) RAW converters over the years, but I’ve never been 100% happy with the results and the workflow specifically.
Now I will say, that if you print images they come out just fine and you can’t really see evidence of the water colour effect.
However, I shoot a lot of stock, and as such every images is inspected by the agencies at 100%, which means A fair amount of rejection due to the fine detail looking like a water colour. I had no such issues with my Canon full frame so it’s not bad technique on my part.

My typical workflow would go something like this.

  • Import to Lightroom, sort and cull.
  • Develop images using Lightroom.
  • Keywords and meta data using Lightroom.
  • Export and upload to stock image library.
  • Some images are accepted but quite a few get rejected because of detail/sharpness/overuse etc.
  • Take rejected images and process in a different RAW convertor.
  • Compare to Lightroom developed version.
  • If signifficantly better, submit again. If not try another convertor.

The whole process became a bit tedious to say the least.
I also didn’t like the experience with some of the other convertors.

Why didn’t I just go back to a Full Frame SLR?
Well, I loved the smaller size and weight of the Fuji and Olympus. It’s much easier to walk and travel with because it’s not just the camera that is smaller, it’s the lenses (to a degree), the filters and tripod can also be smaller.
Sure if I had pots of money I’d have two systems, one for travelling and one for when I don’t have to walk ten miles, butI don’t, so one system has to cover both for the foreseeable future.

So why the Olympus OM-D EM-5 ii?
Earlier this year I joined professional photographer, and editor of Landscape Photography Magazine, Dimitri Vasileiou on a workshop. I was getting ready for the inevitable discussions about how you can’t create landscape images with anything less than a full frame SLR, but to my surprise I found Dimitri using the Olympus OM-D E-M5 Mk II.
I had used micro four thirds cameras in the past but the required level of quality (subjective word used) was not there for me, but the OM-D range takes it up another notch from my previous experiences with the format.
So I took the plunge and bought the E-M5 Mk II and the 12-40mm Pro lens and so far I’ve been very happy with it.

What are the images like compared to the Fuji X-T1?
Well for a start they are much easier to work with in Lightroom, and they sharpen better with none of the water colour effect of the Fuji images.
The Olympus files seem more detailed than the Fuji.
Both cameras are 16 mega pixels (mp) but the Fuji has had a reputation of being as good as a full frame camera despite its APS-C sensor. So how is the Olympus with its even smaller sensor able to look more detailed.
If I were doing lots of portraits or street photography or such like I doubt whether I would notice any difference, but with landscapes it’s different.
Landscapes have lots of areas of grass and trees that are in the middle distance and the Fuji RAW file seems to smooth these out. You then attempt to over sharpen them and introduce an ugly blurry pattern.
In contrast the Olympus has more fine detail in the grass and trees and needs less aggressive sharpening. It could be that this fine detail is actually noise, but who cares it still looks better.
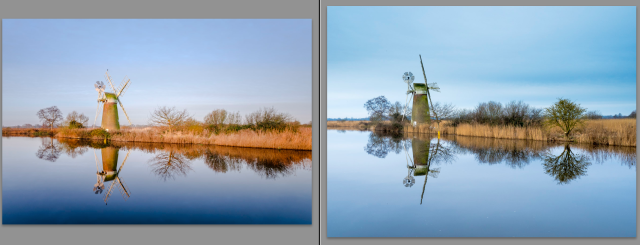
Here is a few samples to (crudely) illustrate my point.
Unfortunately I didn’t have both cameras at the same time, so the images were taken months apart under different lighting and I’ve haven’t tried to match the white balance at all.

Fuji on the left. Olympus on the right.
Notice the difference in aspect. I personally prefer the Olympus 4:3 aspect but that’s just personal.
screen-shot-2016-12-31-at-15-22-07

100% crops
screen-shot-2016-12-31-at-15-23-29screen-shot-2016-12-31-at-15-24-23

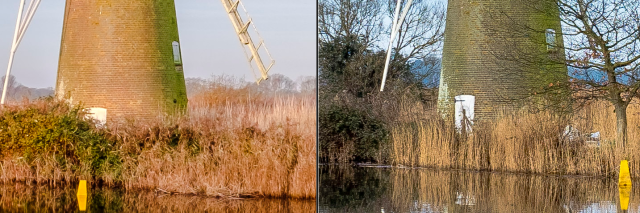
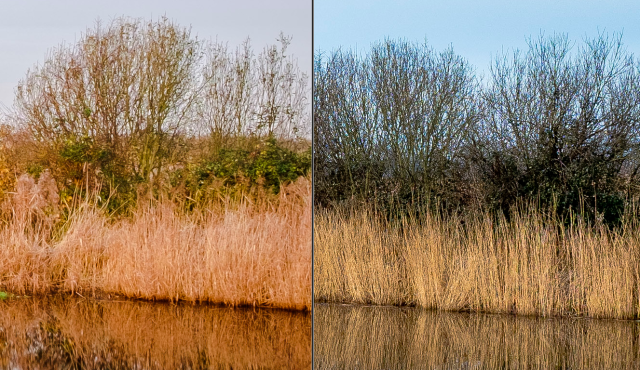
Now I’ll freely admit that this is a case that shows the Fuji at it’s worst, rendering reeds and sharpening in Lightroom. I could have processed it in another convertor like Iridient Developer, but I’d rather stay in Lightroom for my entire workflow.
So the Olympus has given me files that are to all intents and purposes as good as the Fuji (which was better than the Canon 5d ii) and has simplified my workflow tremendously.
So I’m happy (for now).

Is the olympus  OM-D E-M5 Mk II the perfect landscape camera?
Well to be honest there’s no such thing as the perfect camera. All cameras have there strengths and weaknesses and with the current crop of high pixel count cameras like the Canon 5dsr and Sony A7r ii grabbing the attention of many landscape photographers, its hard not to think you need one to be credible now.
I often have an battle with myself regarding the pixel count. It’s very difficult not to be lured by huge images, but there’s a big difference between what we’d like and what we actually need.
Sure if your clients demand huge image sizes then your decision is already made for you, but like myself a lot of people don’t need these, and what about all the images that were taken on 8mp cameras or 2mp cameras years ago? Are these now no good? Of course not.
I’m not trying to berate anyone for there choice of camera here, it is after all your own choice to satisfy your own need.

What about the Hi-Res Shot mode?
The Olympus has a smart trick up it’s sleeve that enables it to capture a 64mp RAW file.
It can only be used for still subjects and many people have said that it is not useable at all for landscapes as any movement can be seen as raw pixels.
I’ve used this mode for a while now and I’ve developed a technique (some would say workaround) that allows me to use it more often than you’d think.
As soon as I’ve written it up I’ll post it here.

For anyone who doubts that serious landscape images can be made with micro four thirds cameras, check out these great photographers.
Phil Norton
Stefano Paletti
Ivan Antolin

Update – February 2018

So one year on from this article, and almost two years using micro four thirds, am I still happy I changed to Olympus?
In a word, yes.
I am now using the E-M1 Mk II and while it’s a little larger then the E-M5 it’s still smaller and lighter than my full frame set up was.
The E-M1 brings improvements in battery life, dynamic range, focusing speed, and slightly increased pixel count, but one of the biggest improvements over the E-M5 is the high res mode. It now handles moving water very well indeed.
This was one of the first shots I took with the E-M1 in high res mode and the water does not show any signs of the issues the E-M5 had, while the detail is stunning.

Curved Defense

I still stand by my original opinion that you have to think about what your final output is going to be. It’s all too easy to get lost in 1:1 pixel comparisons on a computer screen but that is not where most images should end up. I’ve recently provided a client of mine with some 30×20 inch prints, which when mounted and framed are not exactly small, but the quality of the final image was fantastic and my client was delighted.
I’ve also had some of my images used for magazine front covers, one of which was a portrait crop of a landscape image and it was still more than adequate for publication.

So yes, after two years of using Olympus cameras I’m here to stay for the foreseeable future.


Posted in Uncategorized | Leave a comment

Sleeklens Lightroom Workflow Review

I’ve been using Lightroom since version 1.0 so I’d like to think I’m fairly adept with it, but every so often I end up with a few images that I struggle to edit.
So I’ve recently been looking into presets for Lightroom.
A preset is a collection of changes to any number of Lightroom settings, (contrast, saturation, colour balance, clarity, etc, etc.). This preset can then be applied to any image by simply clicking on it in the develop module.
Now a lot of photographers I know reject presets as something for beginners to use, but I disagree. Sure, for a lot of my images I manually add only a few adjustments and I’m well aware that presets won’t work all the time, but I think that’s missing the point.
When you edit an image in Lightroom (or any other program for that matter) you only adjust one parameter at a time. You grab a slider and move it until you see a reasonable change, and if you like it, you leave it there. Then you do the same with the other sliders and so on. Sometimes though, all those adjustments produce an image that you’re ultimately not happy with. Maybe some of the adjustments were OK on their own, but when combined combine in a way you didn’t predict.
That’s where presets come in. Because they contain multiple adjustments so can see the affect of making those adjustments in one go. If you have the Navigator window open in the develop module then you just have to hover over the preset to see the result.
Once you find a preset that gets you near to the look you’re after you can apply that as a starting point, and because the preset is just a collection of adjustments, you can make further changes to those adjustments to fine tune your image.
While it’s possible to make your own presets, it’s probably better to let someone else make them. For a start they are likely to make presets that contain combinations of adjustments that you wouldn’t necessarily think to put together, and you’ll also spent an awful lot of time doing it.

To this end I’ve been trying out the ‘Through The Woods’ Lightroom workflow presets from sleekness.
The bundle contains 51 presets as well as 30 brushes for use with the adjustment brush.
It also contains very clear installation instructions for both Mac and Windows, and their website contains some very good video guides on how to get the best out of them.
The presets are split into two distinct types. First up are the ‘All In One’ presets which a designed to apply multiple adjusts to contrast, clarity, colour, etc. and can work well on some images.

Below is an image I quickly adjusted using an ‘All In One’ preset.
The preset made some nice enhancements to the colour levels in the image. Something which using the saturation slider did not do very well on it’s own.

screen-shot-2016-09-13-at-15-31-08

Next up are what I’d call the workflow presets. They are designed to be stacked together one after they other, working from exposure through colour down to vignettes.
The image below was adjusted  using these presets, working from top to bottom (you can see the edits in the History panel). I finished up with a brush preset applied with the grad tool to darken the sky a little more.

screen-shot-2016-09-16-at-06-56-39

Overall I’ve been impressed with the quality of these sleeklens presets.
Using these has opened my eyes to the possibility of presets, to make adjustments I wouldn’t necessarily have though of.

I would definitely recommend you checking out this ‘Through The Woods’ bundle, as well as others they have on their site.

Links
Sleekness site: https://sleeklens.com
Direct link to workflow: Through The Woods Workflow
Link to all presets: All Presets


Posted in Uncategorized | Leave a comment

New Devon and Cornwall Gallery

A month ago I made the long trip from Norfolk to Devon and Cornwall. Whilst there I attended to capture some of the beauty of their rugged coastlines.
The weather didn’t really help, with high onshore winds that pelted me with either sand or salt spray for much of the trip, but I managed to come away with some images I’m happy with.
I shall definitely be returning again at some point in the future.

Web: http://www.rickbowden.co.uk/Galleries/Devon-And-Cornwall
Mobile: http://www.rickbowden.co.uk/Galleries/Devon-And-Cornwall?mobile=true

Posted in Uncategorized | Leave a comment

Ordinance Survey Maps Arive

Very pleased to have my images on five map covers. Here they are. 


Posted in Uncategorized | Leave a comment

UK Pic of the Day

My image of Derwent Water chosen as UK Pic of the Day on Instagram.

Posted in Uncategorized | Leave a comment

An essential piece of equipment for landscape photography

Many budding landscape photographers worry about which new lens to get next etc but one of the best pieces of kit you can get is pair of wellies, as I found out yesterday when I stepped in a puddle that was rather deeper than I was expecting!  

Posted in Uncategorized | Leave a comment

Images Chosen For Ordnance Survey Maps

I’m proud to announce that five of my images have been chosen by the Ordnance Survey to be used on their maps.
The five images are below and cover the following maps.
Form top left to bottom right.
1. Norfolk Broads.
2. Swansea & Gower.
3. Kendal & Morecambe.
4. Penrith & Keswick.
5. Brighton & Lewes.

OS2015.jpg

Posted in Uncategorized | Leave a comment

Fuji X-Trans – Do you need to do HDR?

(Fuji X-T1 – 10-24mm)

OK so I’ll start by saying that there are some instances where you have to make an HDR image, but I have been experimenting with HDR verses normal highlight/shadow processing with Lightroom’s HDR feature.
The results have left me a bit surprised (and pleased) with just how much detail is available in a Fuji X-Trans RAW file.
In the example below I took three images image of straw bales back-lit against the dusk sky. Each image was a stop apart, enough to capture the sky with no clipping and well lit foreground.
For one image I combined the three RAW images using Lightroom’s HDR function.
For the other image I took the RAW image which had no sky clipping (just happened to be the darkest images) and processed it using a combination of exposure control, shadow recovery, and graduated filter.

Screen Shot 2015-07-22 at 15.22.39Here are some crops of both images.
Screen Shot 2015-07-22 at 15.23.36

Screen Shot 2015-07-22 at 15.23.02

Screen Shot 2015-07-22 at 15.25.26

To my eyes there is hardly any difference in sharpness or noise. You certainly have to look very very closely to see any.

I shall use HDR for when it’s absolutely necessary, but for most high contrast landscapes when I might have considered HDR, I’ll just be using the one image file in future.

Rick
http://richardbowdenphotography.co.uk/Galleries/LatestWork/

Posted in Uncategorized | 1 Comment